
An Archive for Fanatics of Land Rovers
An Archive for Fanatics of Land Rovers
This page was designed as a guide and information resource for for people wanting to replace their current V8 Carb or EFi engines or Tdi with a GMC Diesel V8 engine. Our story covers the rebuild of a Range Rover and engine conversion to the GMC diesel V8.
The GMC V8 diesel engine was available in two forms, the 6.2L 1982 - '90 and the 6.5L '91 - 99. To decide if this would be a suitable engine conversion or not we considered the major points discussed in Land Rover Engine Conversions. Firstly it is locally supported with roughly 4 places in SA the best being Diesel Dog with all parts ex-stock. It was very well supported in its country of origin USA by OEM as well as many aftermarket agencies, it even has a dedicated website. The rebuild lifespan is 100 000 to 300 000 Miles = 160 000 to 500 000 Km, Subject to working conditions and maintenance practice. It would suit a Range Rover and will fit in the engine bay with no cutting, ans a simple adapter ring and disk. Compatability with drivetrain, RR 4 speed Yes, R380 no, all else no, Automatic Yes, All transfer boxes - Yes, Axles yes. Gearing upgrades considered, RR 4 speed - Diff ratio upgrade, Automatic - 1:1.2 Transfer ratio (Discovery), Chev automatic gearbox combo, New Process 4 sp Manual combo. Other upgrades required are heavy duty front springs.
It was also important to consider the pros and cons of this conversion
Pros:
Cons:
Land Rover - Range Rover, 1980 or so, 2 door, bought from Sahara Parts for R 11 000, partially rebuilt.
What I got:


What I did:
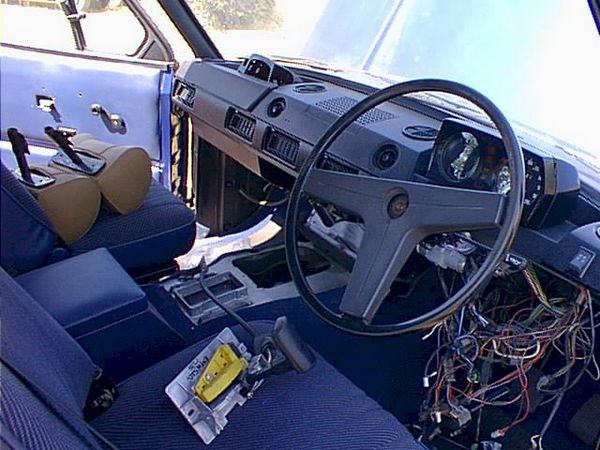
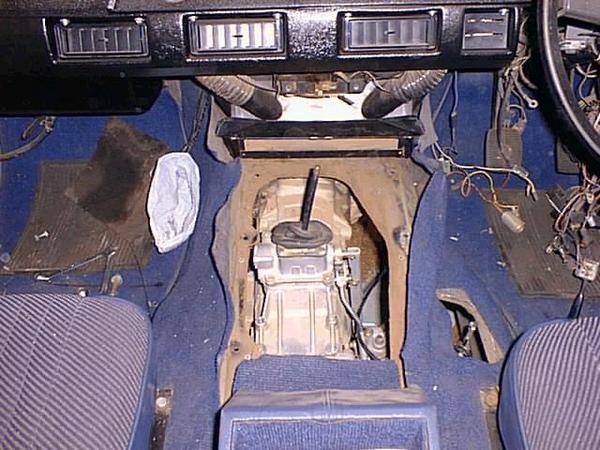
The engine was bought "as is" from Diesel Dog in Pietermaritzburg.
I only later did I find out which models are which and where the date stamp is: Standing on the flexplate side, there is a year and month casting number on the back of the left cylinder bank on the block. I fetched the engine from Pietermaritzburg where I could choose an engine from the 12 or so available at a time. This is very difficult since all engines are very dirty and mostly incomplete and if you are not familiar with them it's worse.
These engines are sourced from scrap yards in the USA, they are cut out of the old vehicle and dumped into a container and shipped out here. They found in various GMC and Chrysler Pick-ups and vans. Vehicles similar to the Ford F250/150 type monsters we have here. The engines can come in any condition, sometimes the thing is totally buggered and other times is is perfect. A very scary lucky dip indeed. These engines may have spent some time upside down in the rain in the scrap yard in the USA. Attempting to start the engine may cause damage.
At the very least, the sump and the oil pump should be removed and cleaned. The glow plugs should be removed and the engine turned by hand to clean everything out. When I cleaned my block out I found 15 years of goo stuff in the water passages. The high pressure cleaner battled to get the goo out, so an engine that has not been stripped is still full of goo and may cause a problem later.
The best advice is to buy the engine and a gasket set. Strip the engine completely and clean it nicely. Put the engine back together using the original parts where possible. In this way you will have a good idea of what the condition of the engine is.
The GMC 6.2 Litre V8 diesels where introduced in 1982 and were used in various Chevrolet and Chrysler trucks and pick-ups. The engine remained in production until 1992 when it was replaced by the 6.5 litre version which is designed for turbo charging. The 6.5 is said to stay in production until 2000, when it will be replaced by a new Duratorque 6.6 Direct injection Turbo designed by GMC/Detroit/Isuzu.
The engine uses an 11" flex plate so all conversions using Chev 4.1 or 350 cid V8's (10" plate) must be modified. The 6.2 and 6.5 basic engines are the same and several of the major components are interchangeable. The heads are interchangeable but the 6.2 heads have smaller pre-combustion chambers and are lighter on fuel, they also deliver less power. Left and right heads are also interchangeable. The 6.2 DV8 is a fully mechanical engine using a mechanical rotary Stanadyne injection pump with a fuel-off solenoid, a high idle solenoid and a cold start solenoid. Both versions are indirectly injected. The timing is by means of gears to the pump and chain to the cam shaft, a full gear drive option is available. The valves are lifted by hydraulic roller lifters which increase cam life dramatically.
The engine has been known to reach between 200 000 and 500 000 kilometres before rebuilding and then rebuilding costs are moderate, comparable to that of a twin carb Land Rover V8 less of course the injector pump and injectors.
GMC 6.2 Litre V8 Indirect Injection Diesel
purchased as-is from Diesel Dog in Pietermaritzburg for R 8 500
fully x-rayed and rebuilt completely for a further R16 000
expected life 500 000 Km before re-build
160 bhp = 120 Kw @ 3800 Rpm
290 Lbft = 400 Nm @ 1800 Rpm
Mass = 300Kg
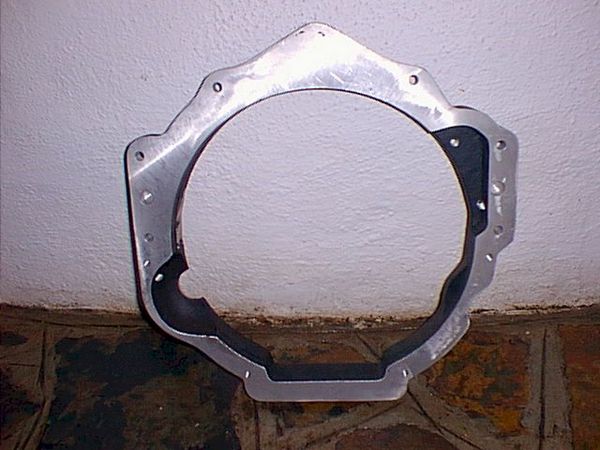

Gilo's Engineering Land Rover R6 to Chev 4.1 Adapter Machined out to 11.5" and modified to suit larger 6.2 Starter motor Adapter ring made from aluminium, machined to suit disco torque converter and GMC Flexplate. +- 22 mm thick
LT230 transfer box adapter: (For the 700R4 Chev auto box and LT230 Transfer box combo)
The 700R4 box fits directly to the GMC engine, but the Land Rover transfer box does not fit...at all !
A company called Chris Mod in Hartebeespoort makes adapters to order, he made an adapter to suit, all out of steel, very neat and straight. De also machines the adapter shaft which is an inner splined tube for the main box and an outer splined shaft for the transfer box, this is then sent away for a decent hardening process. Cost for the adapter plate and shaft: R 2000 and takes +- 2 weeks.
I have removed the Disco box because:
In defence of the box, the box is great but the torque converter cannot be replaced with an up-rated unit as ZF only make TC's per application as opposed to a whole range.
I have fitted a Chev 700R4 box with the following characteristics:
This gearbox is the ideal option for such a conversion, they are ideally suited to each other and the torque converter is perfect. The combination pulls like a train with minimal slip. Gear changes are very comfortable and cruising is really great.
The very low 3.06 1st gear is brilliant for off roading and when low range is selected it is unstoppable.
The Gearbox was obtained from All-O-Matic in Booysens Johannesburg, they supplied a fully rebuilt box with a new diesel torque converter, kick down cable and dipstick and tube for around R 11 000.
The adapter was made by Chris Mod in Hartebeespoort. He does a sterling job using steel tubing and plates.
The trick with the adapter is to move the LT230 transfer box backwards and rotate it downwards so the prop shaft clears the valve body on the auto box, as a result, the whole combination lands up 75 mm longer than the original gearbox and transfer box combination. The auto sump needs to be cut and welded to make space for the prop shaft. Newer model prop shafts have much more clearance than the older models.
The lower floor of the Range Rover needed to be cut out a bit to make space for the hand brake drum. At this spot, there is a reinforcing type tube under the body, part if this tube needed to be cut away.
The low range and dif lock levers need modification as do the gearbox mountings.
The box needs a huge oil cooler to run cool, but at the same time it can take the punishment without sweat.
I would recommend that only a 700R4 or NV 4500 box be used in a conversion, as any other boxes will have severe disadvantages. A common option is the Turbo 350, the little brother to the 700R4 - good cheap box but only has 3 speeds and 3rd is 1:1.
The box works really well, changes soon and smoothly when going calm, but if you plant the accelerator, it pulls really strongly and changes at the right spot with sharp firm shifts.
I have re-wired the lock-up of the gearbox, so now I can latch it in lockup in 2n, 3rd or 4th. Wow ! What a difference, it now drives like a manual / automatic in one.
Pulls off like an auto, then, after changing into 2nd, it locks up and chugs on strongly, then into 3rd and locks immediately all the way to 4th, engine revs never go above 1000 rpm - real fuel saver.
I fitted a much larger radiator, that just fits between the two battery trays, right up against the front and just under the lip of the slam tray. It is a 5 core unit made by NCN in City + Suburban JHB for R 2 200
In defence of the box, the box is great but the torque converter cannot be replaced with an up-rated unit as ZF only make TC's per application as opposed to a whole range.
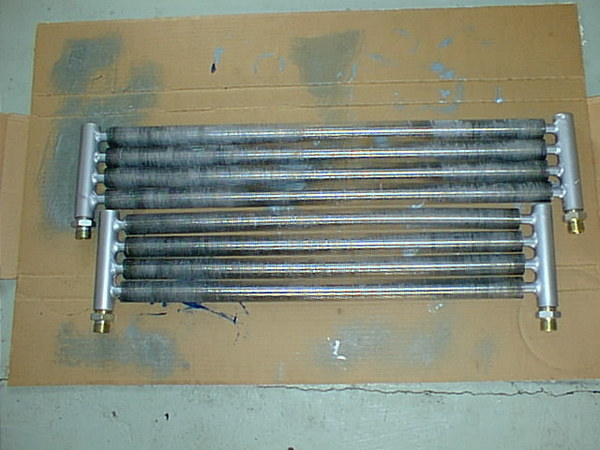
The engine and gearbox oil coolers are custom made by Cirrus Coolers. They where designed to be nested so that the pipes exit neatly. These coolers are of the rolled tube design where the tubes and fins are formed out of the same piece of aluminium tubing, this contributes to efficiency while keeping wind resistance very low. They cost around R 420 each.
The air-con radiator is mounted in front of these oil coolers without any fans (no space).
All the hydraulic hoses are industrial grade crimped 2 wire high pressure hoses with screw fittings.
I originally fitted a fixed mechanical fan, but it was too small as the chassis cross member was in the way, the result was that the water got a bit hot when towing the car trailer with the Millennium bug on. I have recently fitted two air-con fans from a Discovery - -I removed the blades and fitted them on backwards, then fitted the fans to the engine side of the radiator as suckers. I have a two stage temp switch, 1st at 85 deg and the second at 97 deg, this seems to work fine. I would have preferred to fit two 14" fans but the Discovery ones where lying around at home...

The GMC engine uses it's own lift pump, but it has no facility to bleed the system if it is totally empty, therefore I plumbed in the existing original Facet pump that was fitted with the petrol engine.
The original fuel lines where used, but the return line to the tank has a little restriction in the rear tank fitting, this was drilled out. The return line consists of a pipe from the left head across to the right head, and back to the tank, there is no pipe linking the return to the filters (As is the case with early Land Rover Diesels), the injector pump also has a return line that T's into the left-to-right return pipe.
I fitted a dual Lucas/CAV filter head with a sediment bowl below the second filter. The filter element was sourced from a truck scrap yard. The filter elements are standard GUD G629 as used in the series 2 and 3 diesel engines.
The filters are connected in parallel for an increased fuel flow. A single filter or two in series will not permit sufficient fuel flow. The system needs to be bled when empty.
The Inlet and Exhaust system are a part of an engine where you can gain or loose power simply because the engine cannot breathe properly.
I fitted a Donaldson paper filter to the left hand side inner wheel arch that fits between the firewall and the battery box. The filter uses a primary filter element with a second safety element inside. There is a 100 mm diameter elbow and hose connecting the filter to the specially made inlet hat. I fitted a protective hood to the inlet of the filter.
In an attempt to get cooler air, I removed the hood and turned the filter housing to point outwards towards the left hand bonnet edge.
After some time I found a Donaldson filter change indicator unit, which I fitted to the filter, it immediately showed a vacuum over what is recommended. After some investigation, I found that the filter could only flow 5.5 cubic meters, and that the engine wanted 9.5 at full revs, I then relocated the power steering reservoir, battery and radiator pressure tank, then fitted a second 6" unit identical to the first, now the engine smokes less and is more responsive.


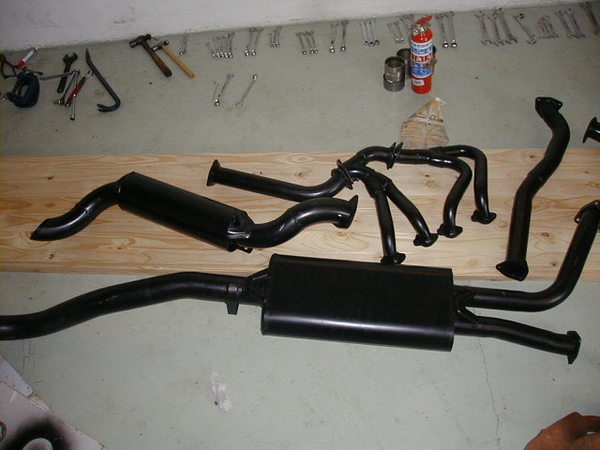
The exhaust system was designed and manufactured by TNT in Germiston. They built the RHS 4-2-1 branch in one piece and the LHS one was built in two pieces, two pipes in front of and two behind the engine mounting.
There are two 3" silencer boxes, one large and flat under the belly and one tubular behind the LHS wheel. All joints use flanges and gaskets and all bends are mandrel bent ie The tube diameter never changes around the bends. The system is very quiet, very firm and fits perfectly.
I fitted 5 extra relays in the system, one each for each bank of glow plugs, one for the fuel-off solenoid, one for the "choke" system one for the starter motor. The glow plug system is operated by means of a push button switch inside. I am not going to fit a glow plug controller/times since the risk of destroyed glow plugs is too high (see PROBLEMS under the main menu)
I connected the temperature switch, via a relay to the fast idle solenoid and the timing retard tab. When the engine is cold it will idle easier and faster until it reaches the temperature of the switch, where after it will idle slowly.
The starter needed to be rebuilt, I took it to Frank at Mobielec auto electrician who sorted it out quickly for R 350.
I fitted electrical oil temperature and pressure gauges on the engine, and one oil temperature gauge in the oil cooler pipe for the gearbox.
I fitted the original petrol V8 temperature sensor to the engine.
The exterior bodywork was not touched, except for a nice new spray job by Elies Panel Beaters in Honeydew. The paint is a baked metallic enamel with base coat and clear coat.
The Chassis was slightly modified, the two brackets that hold the bumper end support brackets where cut off as where the two old radiator mountings. This was done to get the new radiator to fit. By doing this, both battery boxes became bigger so that two 670 heavy duty tractor type batteries can fit in, one each side. I have and only need one.
I trimmed and rebuilt the centre cover to suit the auto gear lever and diff lock/ high low lever.
I fitted Nissan 1400 bakkie mirrors to the doors using the original holes, and had all the handles powder coated. The rear lower tailgate was disassembled, sand blasted and painted and re-assembled.
Vehicle
Engine
Due to my unfamiliarity with the engine, I installed the valve spring rotators on the wrong valves, also the valve stem length was not checked - hey, I didn't know anything about rotators and hydraulic lifters! Anyhow, this all led to serious cylinder head damage to both heads after 15 000Km. Funny thing is I didn't notice a lack of power, only the smoke was getting shocking. After inspection i found that 3 of the 8 exhaust valves have virtually no valve seats to speak of. R 4000 and a VERY nasty learning curve/experience later it is going extremely well, very smooth and not a spot of smoke on cold start up or normal driving.
Transmission
Cooling
Fuel System
Bodywork
Police Clearance
| Description | Supplier | Cost |
|---|---|---|
| Engine | Diesel dog | R8550 |
| Gasket Set | Diesel dog | R599 |
| Pistons | Diesel Dog | R2483.72 |
| Bearings (main, rod, cam) | Diesel Dog | R832 |
| Pin Bushings | Diesel dog | R600 |
| Head bolts, Conrod bolts & nuts | Diesel Dog | R643.23 |
| Injector pump + 8 injectors | Diesel City | R2132 + R2280 |
| Machine work, K liners, Repair heads (!) | JB Engineering | R3899 |
| Balancing | Dynamic Balancing | R412 |
| Starter Motor | Mobielectrical | R350 |
| Glow Plugs AC-11G | Gomers Diesel | R416 |
| Radiator | National Core Manufacturers | R2100 |
| Engine & Gearbox oil coolers | Cirrus Coolers | R400 each |
| EFI Gearbox | Private | R15000 |
| Rear anti toll bar, A/C fans | N1 Landy | R1150 |
| Adapter Ring and machining | Gilo engineering and Rema industries | R1100 |
.jpg)
